How Bioarchive Works
Bioarchive is a disk-to-tape system that utilizes a Spectralogic Black Pearl disk system and a Spectralogic T950 tape library with LTO-8 tape drives. This setup enables users to transfer data to the archive quickly, as data is written to spinning disks, and then the software will move the data to the tape. Unless specified otherwise, all data on Bioarchive is written onto two tapes. One of them stays in the library in case the data is needed, while the other tape is taken to a secure off-site storage facility.
How Bioarchive Billing Works
Each private storage unit is called a Bucket (like a folder), and each bucket needs to be associated with a CFOP number. A user is granted 50GB of storage space before any charge. This is to ensure that the service meets their needs before commitment. Once a bucket passes this initial 50GB threshold, we bill $200 for each TB of data in the next monthly billing period. 10 years after a bucket is billed, the PI will be offered the choice of removing the data or paying for an additional 10 years.
Click here to check your Bioarchive billing. If you need to update the CFOP associated with your account, please email help@igb.illinois.edu
How Do I Start Using Bioarchive?
You will need to fill out a Bioarchive Bucket Request Form. You will receive an email from CNRG once your account is created.
Reset Your Password
The initial email from CNRG includes a temporary password. If you need to reset your password, please email help@igb.illinois.edu for a new temporary password. Once you receive your temporary password, change it immediately by logging in to Bioarchive using your NetID and the temporary password.
- Click on your NetID at the top-right corner and then click "User Profile".
- Click on "Action" at the top-left corner and then choose "Edit".
- Enter your temporary password in the "Current Password" field, then create a new password and confirm it. Be sure to click "Save" when you are done.moves
How to Get S3 Keys
S3 keys are the credentials to access the data assigned to your account. To obtain the keys:
- Log in to Bioarchive with your NetID and password.
- Click on "Action" at the top-left corner and select "Show S3 Credentials".
- A pop-up box will appear with your S3 Access ID and S3 Secret Key. Store these keys in a safe place, as you will need them to access Bioarchive.
How to Transfer Data to Bioarchive
We support data transfer from your local computer system and Biocluster. To prepare for data transfer, you are recommended to put all the data for one project in a directory and compress it into a file. Add a README file to explain the contents inside. Put both the compressed and readme files in a folder. Please keep all files uploaded to Bioarchive to a maximum size of 2TB. This will ensure that files can be successfully uploaded. It also makes sure that you are not uploading or downloading a file for too long, which in turn stops other users from using Bioarchive until your transfer is complete.
Best Practices
If you are transferring data from your computer, it is highly recommended to use an Ethernet connection. Wireless connections are much slower and less reliable. With the amount of data being transferred, wireless is not dependable enough to be reliable.
CyberDuck
The easiest way is to use CyberDuck. Download and install CyberDuck on your computer.
You can download CyberDuck from here. If you are using a Windows computer, make sure to choose the download for Windows. If you are using a Mac computer, make sure to choose the download for macOS.
Install CyberDuck on your computer.
- Inital CyberDuck Setup (Only needs to be done the first time you are accessing Bioarchive)
-
Following these directions to set up CyberDuck for the first time. After you set this up once, CyberDuck should save the profile for future use.
- MacOS
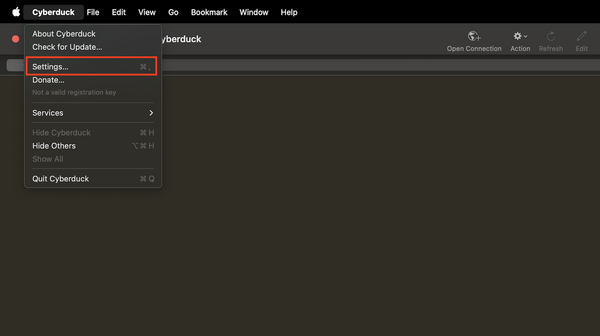
- Open CyberDuck
- Choose File > Setting
- In the settings box that pops up, choose the Profiles tab.
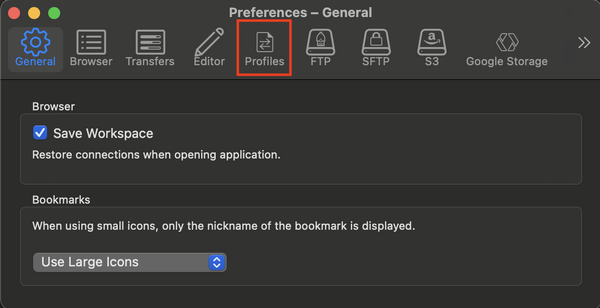
- In the search box, search for Spectra S3 and check the box for Spectra S3 (HTTPS)
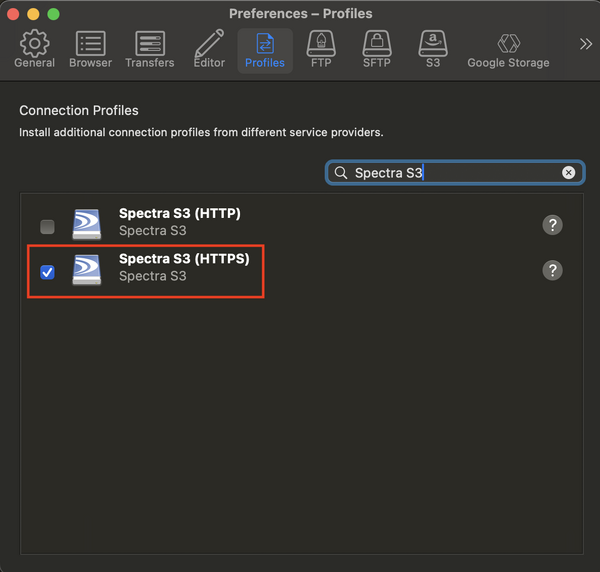
- Once that is complete, you can close the settings pop-up and move on to the next step, Using CyberDuck
- Windows
- Open CyberDuck
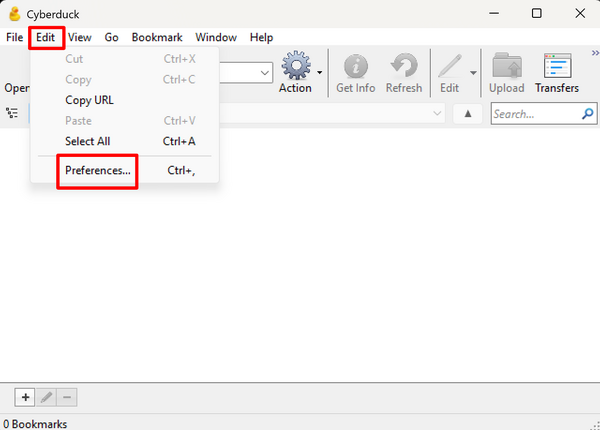
- Choose Edit > Preferences from the menu
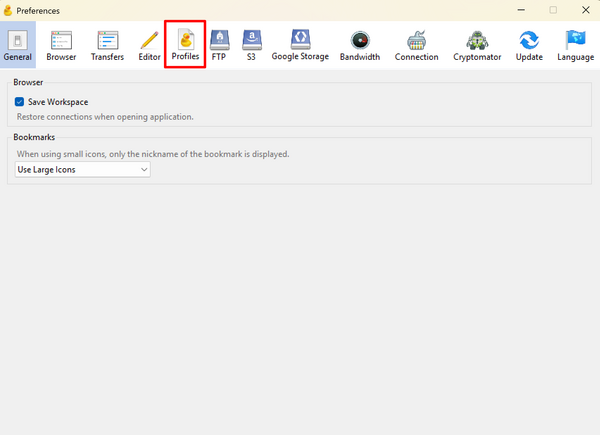
- In the settings box that pops up, choose the Profiles tab.
- In the search box, search for Spectra S3 and check the box for Spectra S3 (HTTPS)
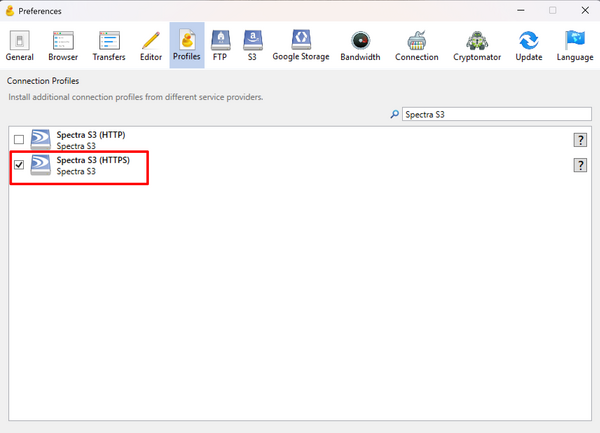
- Once that is complete, you can close the settings pop-up and move on to the next step, Using CyberDuck
- MacOS
Using CyberDuck
- MacOS
- Open CyberDuck
- Choose Open Connection
- In the box that pops up, choose Spectra S3 from the dropdown menu and input the following information.
- Server: bioarchive.igb.illinois.edu
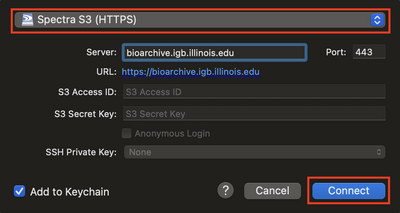
- Port: 443
- S3 Access ID: Your S3 Access ID
- S3 Secret Key: Your S3 Secret Key
- Check the box for Add to Keychain if you would like CyberDuck to remember this information.
- Server: bioarchive.igb.illinois.edu
- Click Connect
- After it is connected, you will see a list of buckets. You can drag and drop anything into the bucket from your computer that you want to upload, or drag and drop anything from inside the bucket to your local computer that you need to download. You can also choose File > Download or File > Upload
- To save the session so that you can open it easily next time, you can choose Bookmark > New Bookmark, which will create a bookmark for the connection for next time. You will leave all the information the same except for one setting. At the bottom, choose More Options and then for the Transfer Files field, choose Open multiple connections from the dropdown menu.
- Windows
- Open CyberDuck
- Choose Open Connection
- In the box that pops up, choose Spectra S3 from the dropdown menu and input the following information.
- Server: bioarchive.igb.illinois.edu

- Port: 443
- S3 Access ID: Your S3 Access ID
- S3 Secret Key: Your S3 Secret Key
- Check the box for Save Password if you would like CyberDuck to remember this information.
- Server: bioarchive.igb.illinois.edu
- Click Connect
- After it is connected, you will see a list of buckets. You can drag and drop anything into the bucket from your computer that you want to upload, or drag and drop anything from inside the bucket to your local computer that you need to download. You can also choose File > Download or File > Upload
- To save the session so that you can open it easily next time, you can choose Bookmark > New Bookmark, which will create a bookmark for the connection for next time. You will leave all the information the same except for one setting. At the bottom, choose More Options, and then for the Transfer Files field, choose Open multiple connections from the dropdown menu.
Using Biocluster
The tool to access Bioarchive is already installed on Biocluster. You will need to load the module.
module load ds3_java_cli- Inital Setup (Only needs to be done the first time you are accessing Bioarchive from Biocluster)
-
If this is your first time using Bioarchive, you will need to run the below script. If this is NOT your first time using Bioarchive, you can skip this step. This will add the utilities to your environment. Then, load the program we created to set up the environment variables. Enter your secret key and access key when prompted. All the bold text in the commands below denotes items that need to be replaced with information pertinent to you.
[]$ archive_environment.py
Directory exists, but file does not
Enter S3 Access ID: S3_Access_ID
Enter S3 Secret Key: S3_Secret_Key
Archive variables already loaded in .bashrc
Environment updated for next login.  To use new values
in this session, please type 'source .archive/credentials'
Be sure to type:
source .archive/credentials
After your first connection to Bioarchive, you will not be asked for the S3 Access ID and S3 Secret Key again if you connect from the same Biocluster account.
To list available buckets:
ds3_java_cli -c get_serviceIt will only return a list of buckets that the user has permission to access.
To view files in a bucket on Bioarchive:
ds3_java_cli -b Bucket_Name -c get_bucketThis will list all files, their sizes, their owners, and the total size of data in the bucket.
To transfer all the contents in a directory to Bioarchive:
ds3_java_cli -b Bucket_Name -c put_bulk -d Directory_NameThis will transfer everything in this directory, but not the directory itself.
To transfer a file to Bioarchive:
ds3_java_cli -b Bucket_Name -c put_object -o File_NameTo transfer a file to a certain directory on Bioarchive:
ds3_java_cli -b Bucket_Name -c put_object -o File_Name -p Directory/To transfer a file from Bioarchive to Biocluster:
ds3_java_cli -b Bucket_Name -c get_object -o File_NameTo transfer all files and directories in a bucket from Bioarchive to Biocluster:
ds3_java_cli -b Bucket_Name -c get_bulkYou can add a -p tag to restrict the transfer scope to a directory.