

Quick Links
• Main Site - http://biocluster.igb.illinois.edu
• Request Account - http://www.igb.illinois.edu/content/biocluster-account-form
• Cluster Accounting - https://bioapps3.igb.illinois.edu/accounting/
• Cluster Monitoring - https://bioapps3.igb.illinois.edu/ganglia/
• SLURM Script Generator - http://www-app.igb.illinois.edu/tools/slurm/
• Biocluster Applications - https://help.igb.illinois.edu/Biocluster_Applications
• Biocluster Introduction Presentation - Intro to Biocluster Spring 2025.pptx
Biocluster is the High Performance Computing (HPC) resource for the Carl R. Woese Institute for Genomic Biology (IGB) at the University of Illinois at Urbana-Champaign (UIUC). Containing 2456 cores and over 36 TB of RAM, Biocluster has a mix of various RAM and CPU configurations on nodes to best serve the various computation needs of the IGB and the Bioinformatics community at UIUC. For storage, Biocluster has 2.4 Petabytes of storage on its GPFS filesystem for reliable high speed data transfers within the cluster. Networking in Biocluster is either 10 or 40 Gigibit ethernet depending on the class of node and its data transfer needs.
• The Biocluster is not an authorized location to store HIPAA-protected data.
• If you need to update the CFOP associated with your account, please send an email with the new CFOP to help@igb.illinois.edu
- Gaining Access
-
Please fill out the form at http://www.igb.illinois.edu/content/biocluster-account-form to request access to the Biocluster.
- Biocluster Policies
-
Running jobs on the head node or login nodes are strictly prohibited. Running jobs on the head node could cause the entire cluster to crash and affect everyone's jobs on the cluster. Any program found to be running on the head node will be stopped immediately and your account could be locked. You can start an interactive session to log in to a node to manually run programs.
Installing Software Please email help@igb.illinois.edu for any software requests. Compiled software will be installed in /home/apps. If it's a standard RedHat package (rpm), it will be installed in their default locations on the nodes.
Creating or Installing Programs: Programs you create or move to the cluster should be first tested outside of the cluster for stability. Once your program is stable, then it can be moved to the cluster for use. Unstable programs that cause problems with the cluster can result in your account being locked. Programs should only be added by CNRG personnel and not compiled in your home directory.
Reserving Memory: SLURM allows the user to specify the amount of memory they want their program to use. If your job tries to use more memory than you have reserved, the job will run out of memory and die. Make sure to specify the correct amount of memory.
Reserving Nodes and Processors: For each job, you must reserve the correct number of nodes and processors. By default, you are reserved 1 processor on 1 node. If you are running a multiple processor job or a MPI job you need to reserve the appropriate amount. If you do not reserve the correct amount, the cluster will confine your job to that limit, increasing its runtime.
Storing data in dropbox folders is prohibited. Dropboxes are meant to facilitate the transfer of data from one user to another. In general, these should be empty most of the time. In order for the billing systems to work properly, we need all data stored outside of dropbox folders as soon as possible.
- Cluster Specifications
-
The storage system is a GPFS filesystem with 2.4 Petabytes of total disk space with 2 copies of the data for 1.2 Petabytes of usable space. This data is NOT backed up.
The data is spread across 8 GPFS storage nodes.
Queue Name Nodes Cores (CPUs) per Node Memory Networking Scratch Space (/scratch) GPUs normal (default) 6 Supermicro 128 AMY EPYC 7543 2TB 10GB Ethernet 7TB NVMe gpu 1 Supermicro 28 Intel Xeon E5-2680 @ 2.4Ghz 256GB 1GB Ethernet 1TB SSD 4 NVIDIA A40 classroom 5 Supermicro 72 Intel Xeon Gold 6150 CPU @ 2.7GHz 1.2TB 10GB Ethernet 8TB SSD - Storage Cost
-
On April 1, 2021, CNRG was informed by campus that we were required to start billing external users paying with a credit card an external rate. This rate was given to us by campus and is obtained by adding the 31.7% F&A rate and adding the standard 2.3% credit card fee. This external rate is only charged to users paying with a credit card.
Internal Cost (Per Terabyte Per Month) External Cost (Per Terabyte Per Month) $8.75 $11.73 Calculate Storage Usage (/home)
Each Month, you will receive a bill for your monthly storage usage. We take a snapshot of usage daily. Then we average the usage from the daily snapshots to get an average usage for the month.
You can calculate your storage usage using the du command. An example is below. The result will be double what you are billed as there are 2 copies of the data. Make sure to divide by 2.
du -h /home/a-m/usernameCalculate Private Storage Usage (/private_stores)
These are private data storage nodes. They do not get billed monthly. The filesystems are XFS shared over NFS.
To calculate usage, use the du command:
du -h /private-stores/shared/directory - Queue Costs
-
The cost for each job is dependent on which queue it is submitted to. Listed below are the different queues on the cluster with their cost. Although the service is billed by the second, the rates below are what it would cost per day to use each resource. For standard computation, the CPU cost and the memory cost are compared and the highest is billed. For GPU bills the cost of the CPU or memory is added to that of the GPU.
Queue Name CPU Cost External CPU Cost Memory Cost External Memory Cost GPU Cost External GPU Cost normal (default) $1.19 $1.59 $0.08 $0.09 N/A N/A GPU $2.00 $2.68 $0.44 $0.59 $2.00 $2.68 - How To Log into Biocluster
-
You will need to use an SSH client to connect.
NOTICE: The login hostname is biologin.igb.illinois.edu
On Windows
- You can download Putty from http://www.chiark.greenend.org.uk/~sgtatham/putty/download.html
- Install Putty and run it, in the Host Name input box enter biologin.igb.illinois.edu

- Hit Open and log in using your IGB account credentials.
On macOS
- Simply open the terminal under Go >> Utilities >> Terminal
- Type in ssh username@biologin.igb.illinois.edu where username is your NetID.
- Hit the enter key and type in your IGB password.
- Create a Job Script
-
- The cluster runs the SLURM queuing and resource management program.
- All jobs are submitted to SLURM which distributes them automatically to the Nodes.
- You can find all of the parameters that SLURM uses at https://slurm.schedmd.com/quickstart.html
- You can use our SLURM Generation Utility to help you learn to generate job scripts http://www-app.igb.illinois.edu/tools/slurm/
Create a Job Script
- You must first create a SLURM job script file in order to tell SLURM how and what to execute on the nodes.
- Type the following into a text editor and save the file test.sh
#!/bin/bash #SBATCH -p normal #SBATCH --mem=1g #SBATCH -N 1 #SBATCH -n 1 sleep 20 echo "Test Script"- You just created a simple SLURM Job Script.
- To submit the script to the cluster, you will use the sbatch command.
sbatch test.sh- Line by line explanation
- #!/bin/bash - tells linux this is a bash program and it should use a bash interpreter to execute it.
- #SBATCH - are SLURM parameters, for explanations of these please scroll down to SLURM Parameters Explanations section.
- sleep 20 - Sleep 20 seconds (only used to simulate processing time for this example)
- echo "Test Script" - Output some text to the screen when job completes ( simulate output for this example)
- For example, if you would like to run a blast job you may simply replace the last two line with the following:
module load BLAST blastall -p blastn -d nt -i input.fasta -e 10 -o output.result -v 10 -b 5 -a 5- Note: the module commands are explained under the Applications dropdown in the Environment Modules section
SLURM Parameters Explanations:
- To view all possible parameters
- Run man sbatch at the command line
- Go to https://slurm.schedmd.com/sbatch.html to view the man page online
Command Description #SBATCH -p PARTITION Run the job on a specific queue/partition. This defaults to the "normal" queue #SBATCH -D /tmp/working_dir Run the script from the /tmp/working_dir directory. This defaults to the current directory you are in. #SBATCH -J ExampleJobName Name of the job will be ExampleJobName #SBATCH -e /path/to/errorfile Split off the error stream to this file. By default output and error streams are placed in the same file. #SBATCH -o /path/to/outputfile Split off the output stream to this file. By default output and error streams are placed in the same file. #SBATCH --mail-user username@illinois.edu Send an e-mail to specified email to receive job information. #SBATCH --mail-type BEGIN, END, FAIL Specifies when to send a message to email. You can select multiple of these with a comma separated list. Many other options exist. #SBATCH -N X Reserve X number of nodes. #SBATCH -n X Reserve X number of CPUs. #SBATCH --mem=XG Reserve X gigabytes of RAM for the job. #SBATCH --gres=gpu:X Reserve X NVIDIA GPUs. (Only on GPU queues)
Create a Job Array Script
Making a new copy of the script and then submitting each one for every input data file is time consuming. An alternative is to make a job array using the #SBATCH --array option in your job script. The #SBATCH --array option allows many copies of the same script to be queued all at once. You can use the $SLURM_ARRAY_TASK_ID to differentiate between the different jobs in the array. For a detailed example on how to do this, please see our Job Arrays guide.
- Start an Interactive Session
-
- Use the srun command if you would like to run a job interactively.
srun --pty /bin/bash- This will automatically reserve you a slot on one of the compute nodes and will start a terminal session on it.
- Closing your terminal window will also kill your processes running in your interactive srun session, therefore it's better to submit large jobs via non-interactive sbatch.
- X11 Graphical Applications
-
- To run an application with a user interface you will need to setup an Xserver on your computer. See the Xserver Guide for directions for setting it up.
- Then add the --x11 parameter to your srun command
srun --x11 --pty /bin/bash - View or Delete Submitted Jobs
-
Viewing Job Status
- To get a simple view of your current running jobs you may type:
squeue -u userid- This command brings up a list of your current running jobs.
- The first number represents the job's ID number.
- Jobs may have different status flags:
- R = job is currently running
- For more detailed view type:
squeue -l- This will return a list of all nodes, their slot availability, and your current jobs.
List Queues
- Simple view
sinfo- This will show all queues as well as which nodes in those queues are fully user (alloc), partially used (mix), unused (idle), or unavailable (down).
List All Jobs on Cluster with Nodes
squeue
Deleting Jobs
- Note: You can only delete jobs which are owned by you.
- To delete a job by job-ID number, you will need to use scancel. For example, to delete a job with ID number 5523, you would type:
scancel 5523- To delete all of your jobs, you would type:
scancel -u userid
Troubleshooting Job Errors
- To view job errors, you can use scontrol. For example, to view job errors for a job with ID number 23451, you would type:
scontrol show job 23451 - Applications
-
Application Lists
- You can view a list of installed applications at https://help.igb.illinois.edu/Biocluster_Applications
- To view a list of currently installed applications from the command line, run module avail
Application Installation
- Please email help@igb.illinois.edu to request new application or version upgrades.
- The Biocluster uses EasyBuild to build and install software. You can read more about EasyBuild at https://github.com/easybuilders/easybuild
- The Biocluster EasyBuild scripts are located at https://github.com/IGB-UIUC/easybuild
Environment Modules
- The Biocluster uses the Lmod modules package to manage the software that is installed. You can read more about Lmod at https://lmod.readthedocs.io/en/latest/
- To use an application, you need to use the module command to load the settings for an application
- To load a particular environment for example QIIME/1.9.1, simply run this command:
module load QIIME/1.9.1- If you would like to simply load the latest version, run the command without the “/1.9.1” (version number):
module load QIIME- To view which environments you have loaded simply run module list:
bash-4.1$ module list Currently Loaded Modules: 1) BLAST/2.2.26-Linux_x86_64 2) QIIME/1.9.1- When submitting a job using a sbatch script you will have to add the module load qiime/1.5.0 line before running qiime in the script.
- To unload a module simply run module unload:
module unload QIIME- Unload all modules
module purge
Containers
- The Biocluster cluster supports Singularity to run containers.
- We have a Singularity guide to help you use it.
R Packages
- We have a local mirror of the CRAN and Bioconductor. This allows you to install packages through an interactive session into your home folder.
- To install a package, run an interactive session
srun --pty /bin/bash- Load the R module
module load R/4.4.0-IGB-gcc-8.2.0- Run R
R- For CRAN packages, run install.packages()
install.packages('shape');- For Bioconductor packages, the BiocManager package is already installed. You just need to run BiocManager::install to install a package
BiocManager::install('dada2')- If the package requires any external dependencies, you should email us to get it install centrally.
Python Packages
- Most python packages in pypi, https://pypi.org/, are now precompiled.
- If the package is in pypi, from the biologin nodes, module load the Python version you want to use
module load Python/3.10.1-IGB-gcc-8.2.0- Then run pip install to install the package
pip install package_name- This might not work if it needs to compile the package or it needs to compile dependency packages. If that is the case, then email help@igb.illinois.edu and we can get it installed.
Jupyter
- The biocluster has jupyterhub installed to allow you to run juypter notebooks at https://bioapps3.igb.illinois.edu/jupyter
Creating Custom Conda Environment
- NOTE: This must be done from the biologin nodes. It will fail on the compute nodes as they do not have access to the internet
- From Regular Command Line using SSH
- Load Anaconda Module
module load Anaconda3- Create Conda Environment. Currently this doesn't work with a python version 3.11 or later
conda create -p $HOME/testenv python=3.10- Activate Conda Environment
conda activate $HOME/testenv- Install ipython conda package
conda install ipykernel- Install custom ipykernel module. This will install the kernel file into $HOME/.local/share/jupyter/kernels. This can be seen by jupyterhub
ipython kernel install --user --name='testenv'- Open Jupyterhub at https://bioapps3.igb.illinois.edu/jupyter and start a server.
- Your testenv kernel should be listed in the list of kernels
Alphafold
- The Biocluster has Alphafold installed. There is specific instructions that need to be followed to run it on the Biocluster. Please follow our Alphafold guide.
- Mirror Service - Genomic Databases
-
- Biocluster provides mirrors of public accessible genomic databases.
- If a database is not installed and it is publicly accessible, email help@igb.illinois.edu and we can get it installed.
- If it is private database, then it must be placed in your home folder or a private group or lab folder.
- A list of databases is a located at Biocluster Mirrors.
- Transferring Data Files
-
Transferring using SFTP/SCP
Using WinSCP (Windows)
- Download WinSCP installation package from http://winscp.net/eng/download.php#download2 and install it.
- Once installed, open WinSCP.
- Enter biologin.igb.illinois.edu for the Host name
- Enter your IGB username and password and click Login
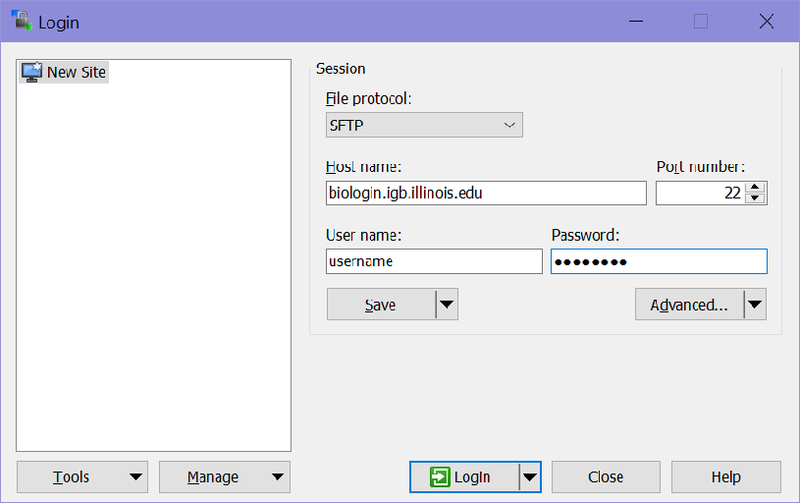
- After you click on Login, you should be connected to your Biocluster home folder, as shown below.
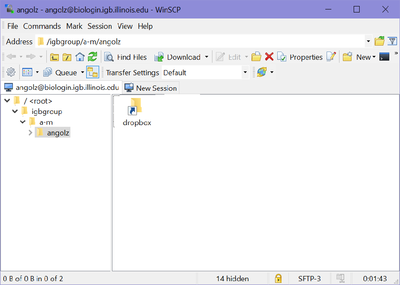
- From here you should be able to download or transfer your files.
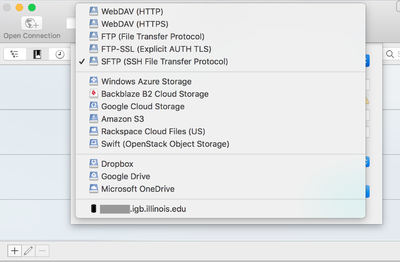
Using CyberDuck
- To download CyberDuck go to http://cyberduck.c and click on the large Zip icon to download.
- Once CyberDuck is installed on MacOS, open the program.
- Click on Open Connection.
- From the drop down menu at the top of the opopup window select SFTP(SSH File Transfer Protocol)
- In the Server box, enter biologin.igb.illinois.edu and for the Username and Password fields, enter your IGB credentials.
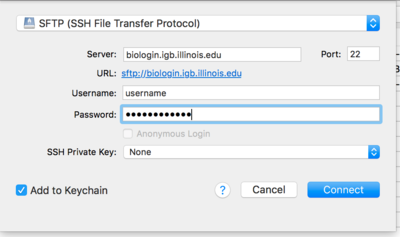
- Click Connect.
- You may now download or transfer your files.
- NOTICE: CyberDuck by default wants to open multiple connections for transferring files. The Biocluster firewall limits you to 4 connections a minute. This can cause transfers to timeout. You can change CyberDuck to only use 1 connection by going to Preferences>Transfers>Transfer Files and then select Open Single Connection.
Transferring using Globus
- The biocluster has a Globus endpoint setup. The Collection Name is biocluster.igb.illinois.edu
- Globus allows the transferring of very large files reliably.
- Please see our Globus guide for instructions on how to set up and use Globus.
Core-server
- The core-server is mounted on the biologin nodes at /private_stores/core-server.
- It is read-only; meaning you can only transfer data from the core-server to Biocluster. You cannot transfer any data from Biocluster to the core-server.
References
• OpenHPC https://openhpc.community/
• SLURM Job Scheduler Documentation - https://slurm.schedmd.com/
• Rosetta Stone of Schedulers - https://slurm.schedmd.com/rosetta.pdf
• SLURM Quick Reference - https://slurm.schedmd.com/pdfs/summary.pdf
• GPFS Filesystem https://en.wikipedia.org/wiki/IBM_Spectrum_Scale
• Lmod Module Homepage - https://www.tacc.utexas.edu/research-development/tacc-projects/lmod
• Lmod Documentation - https://lmod.readthedocs.io/en/latest/